# 跑通示例项目 (/zh-CN/solutions/one-to-one-live/custom-signaling/get-started/run-example/ios)
> For AI agents: see the complete documentation index at [llms.txt](/llms.txt).
声网在 `CallAPI` 仓库中提供基于三方信令(环信)方案实现的 1v1 私密房和秀场转 1v1 的源代码供你参考。
本文介绍如何快速跑通该示例项目,体验直播效果。
## 前提条件 [#前提条件-1]
开始前,请确保满足如下前提条件:
- 参考[开通一对一直播服务](/zh-CN/solutions/one-to-one-live/custom-signaling/build/setup-and-access/enable-service)在控制台创建项目,获取 App ID 和 App 证书,并[开通三方信令服务的权限](/zh-CN/solutions/one-to-one-live/custom-signaling/build/setup-and-access/enable-service#开通第三方信令服务)
- [Git](https://git-scm.com/downloads)
- [CocoaPods](https://guides.cocoapods.org/using/getting-started.html#getting-started)
- [Xcode](https://apps.apple.com/cn/app/xcode/id497799835?mt=12) 12.0 及以上
- 有效的苹果开发者账号
- iOS 设备,版本 13.0 及以上
:::warning[注意]
声网推荐使用真机运行项目。部分模拟机可能存在功能缺失或者性能问题。
:::
## 克隆仓库 [#克隆仓库-1]
运行以下命令克隆仓库到本地:
```shell
git clone git@github.com:AgoraIO-Community/CallAPI.git
```
## 配置示例项目 [#配置示例项目-1]
按照如下步骤进行配置:
1. 运行项目前,你需要在 `/CallAPI/iOS/Example/CallAPI/KeyCenter.swift` 文件中设置如下参数:
```swift
static let AppId: String = <#Your AppId#>
static let Certificate: String? = <#Your Certificate#>
static var IMAppKey: String = <#Your EaseMob AppKey#>
```
填入你在[开通一对一直播服务](/zh-CN/solutions/one-to-one-live/custom-signaling/build/setup-and-access/enable-service)时获取的声网项目的 App ID、App 证书和环信项目的 App Key:
| 参数 | 描述 | 获取方式 |
|----|----|----|
| `AppId` | 声网项目的 App ID | [获取 App ID](/zh-CN/solutions/one-to-one-live/custom-signaling/build/setup-and-access/enable-service#获取-app-id) |
| `Certificate` | 声网项目的 App 证书 |[获取 App 证书](/zh-CN/solutions/one-to-one-live/custom-signaling/build/setup-and-access/enable-service#获取-app-证书) |
| `IMAppKey` | 环信项目的 App Key | [获取 App Key](/zh-CN/solutions/one-to-one-live/custom-signaling/build/setup-and-access/enable-service#开通第三方信令服务) |
2. 在 `/CallAPI/iOS/Example` 目录下运行 `pod install`,然后等待依赖库安装完成。
## 编译并运行示例项目 [#编译并运行示例项目-1]
按照如下步骤进行操作:
:::warning[注意]
声网自定义信令方案的 1v1 私密房和秀场转 1v1 示例项目基于 CallAPI 和三方信令服务共同开发。运行前请确保你的项目已[开通三方信令服务权限](/zh-CN/solutions/one-to-one-live/custom-signaling/build/setup-and-access/enable-service#开通第三方信令服务)。
:::
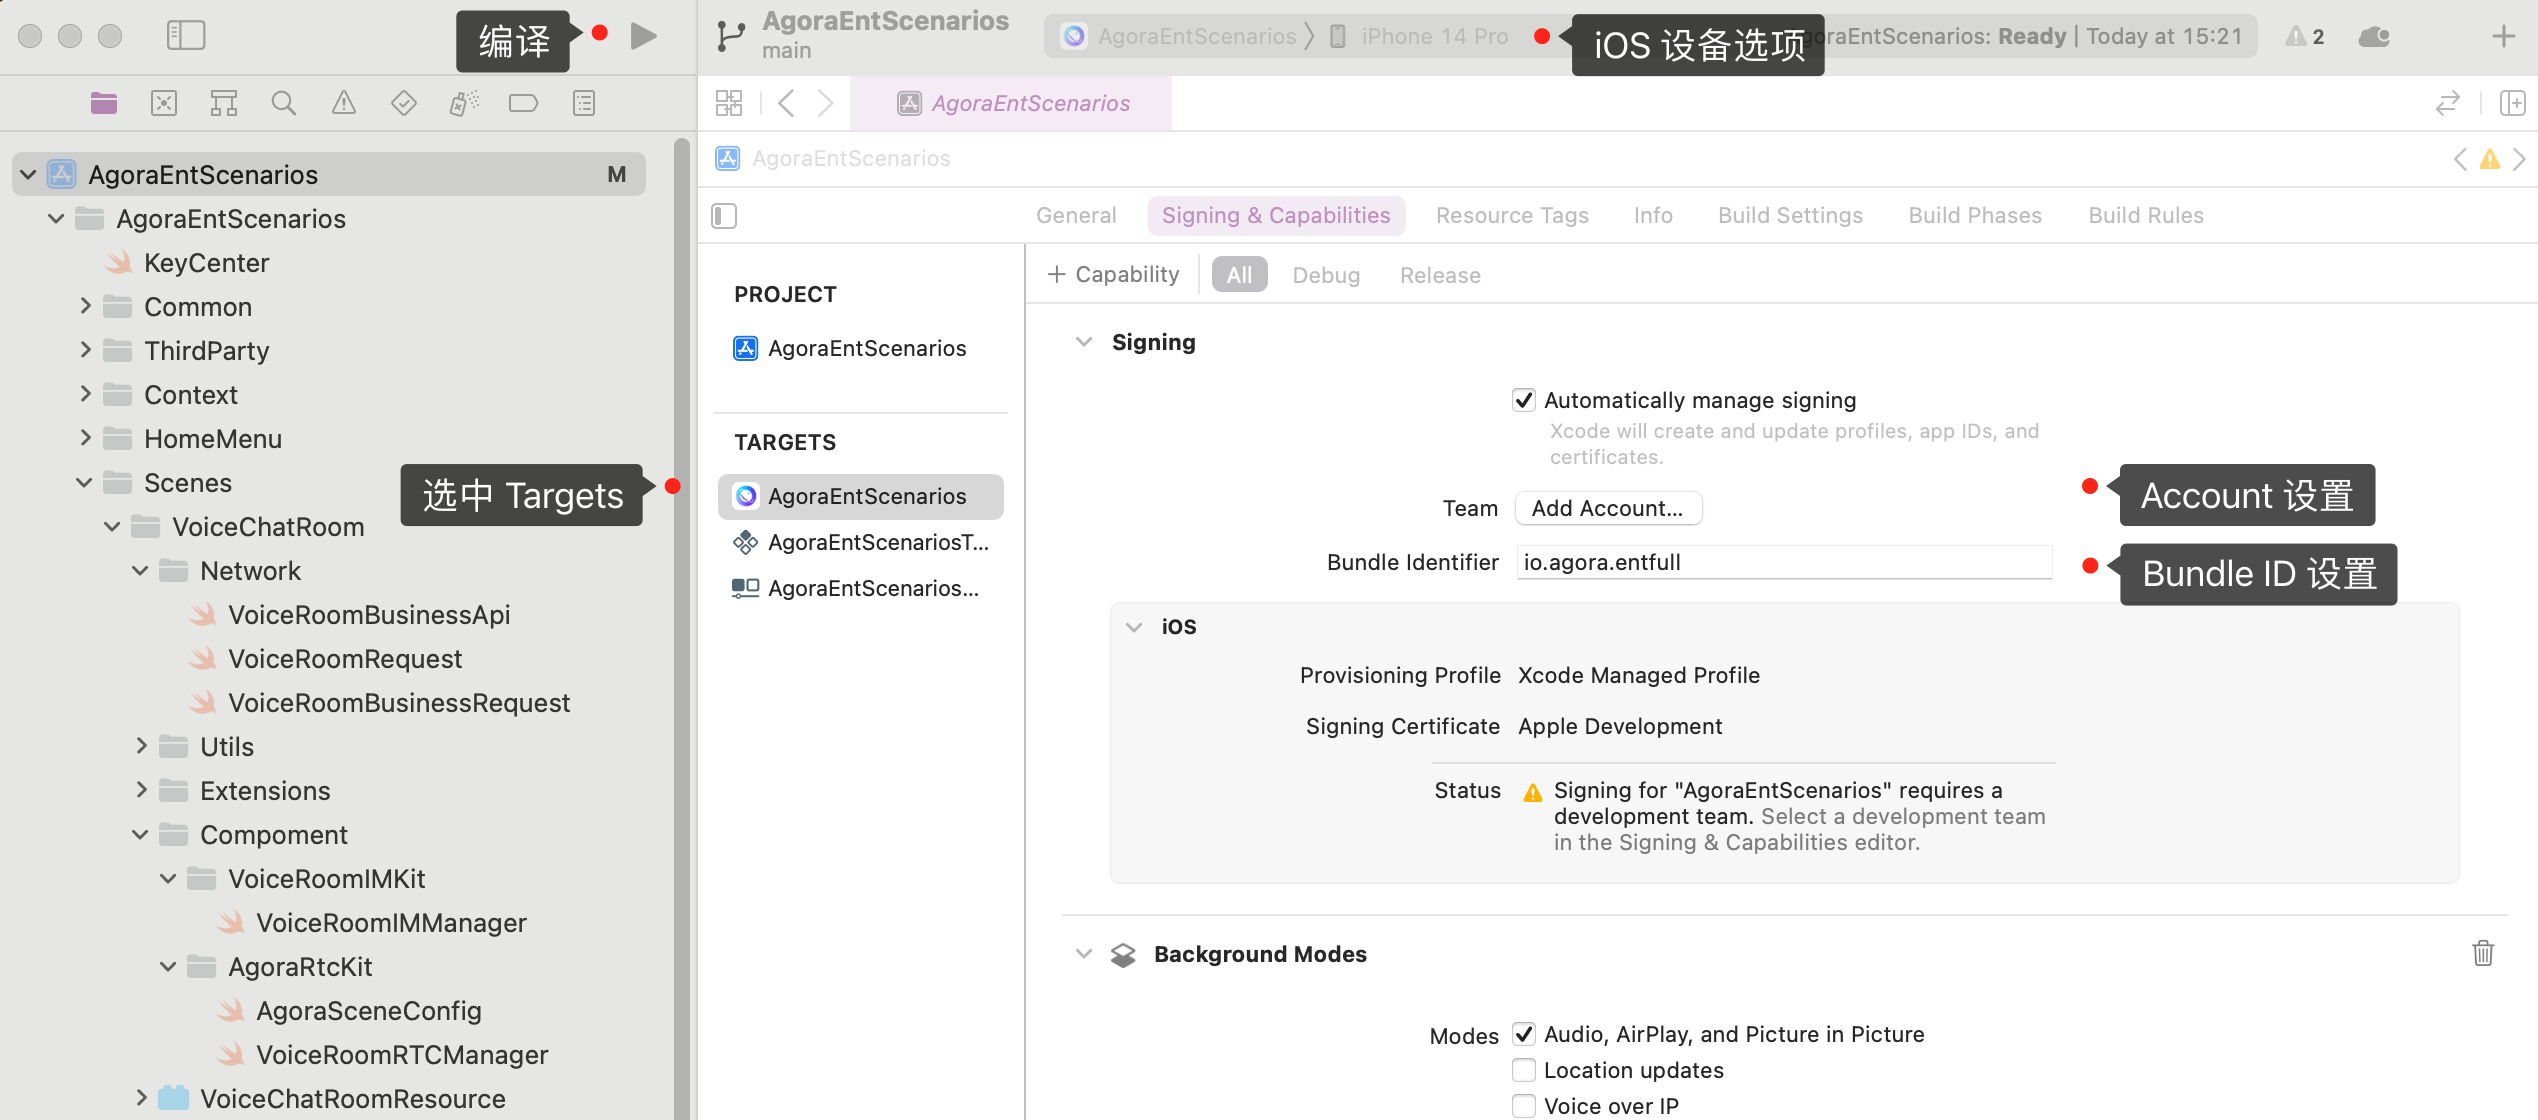
1. 连接上 iOS 设备后,点击 `CallAPI.xcworkspace` 文件以通过 Xcode 打开项目,并在 **iOS Device** 选项中勾选上你的 iOS 设备。
2. 在项目 **TARGETS** 下的 **Signing & Capabilities** 界面勾选 **Automatically manage signing**,配置你的苹果开发者账号和 **Bundle Identifier**。Bundle ID 用于在设备上唯一标识应用程序。在开发应用时,你需要设置 Bundle ID。在此处设置的 Bundle ID 需要与你的项目签名配置保持一致。
3. 点击 开始编译。
:::info[信息]
如果之前运行过该项目,Xcode 可能在编译时会报 `AUIMoreDialog has different definitions ...` 的错。你可以使用 `cmd` + `shift` + `K` 清理后再尝试编译。
:::
4. 编译成功后,你的 iOS 设备上会出现 CallAPI 应用。在 iOS 系统设置中将该应用设为信任开发者后你才能打开应用。
5. 打开应用,点击 **1v1 私密房**或**秀场转 1v1 私密房**,即可进行体验。主播可以创建房间;观众可以加入房间。
:::warning[注意]
你需要在两个客户端都打开应用,且都选择 **1v1 私密房**或**秀场直播转 1v1 私密房**才能进行互动体验。
:::
## 常见问题 [#常见问题]
### 签名报错 [#签名报错]
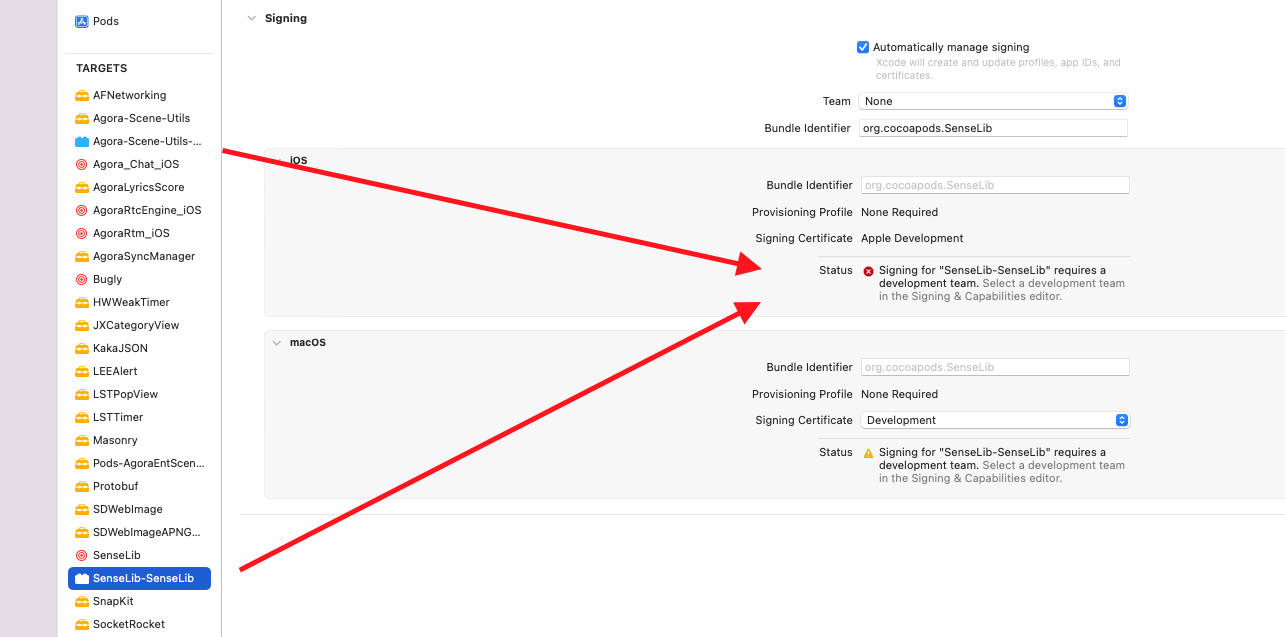
使用 Xcode 14 编译失败,遇到 **Signing for "SenseLib-SenseLib" requires a development team** 的签名报错,如下面截图所示:
#### 解决方案 [#解决方案]
你可以通过在 Terminal 中执行如下命令将 CocoaPods 升级到 1.12.0 以上解决报错。
```shell
sudo gem install -n /usr/local/bin cocoapods
```
#### 备选解决方案 [#备选解决方案]
如果遇到 CocoaPods 升级失败,你还可以通过手动给第三方库签名来解决报错。将 **Signing > Team** 设置为你的开发团队即可。